

Dallans Hat Pack
Добавляет более 500 новых шляп в Hat Room in the Breach! Вход в шляпную комнату находится с правой стороны от пролома возле комнаты лифта Shortcut, рядом с Винчестером.

 Мод для Enter the Gungeon
от SpecialAPI
Позволяет легко создавать новые шляпы с помощью специальных файлов шляпы.
Hat Loader — мод для Enter the Gungeon (Энтер зе Ганжеон) от автора SpecialAPI. Позволяет легко создавать новые шляпы с помощью специальных файлов шляпы.
Его скачали 8,3 тыс. раз: это 75-е место среди модов Enter the Gungeon в нашем каталоге, редкость — «редкий» (топ-50% по скачиваниям). Мод давно не обновлялся — проверьте совместимость с текущей версией игры, актуальная версия — 1.3.0.
Для работы ему нужны: Mod the Gungeon API, Alexandria.
Текст автора на языке оригинала
Allows you to easily make new hats using special -hat.spapi files. No code required!
Inside of the plugins folder (doesn't have to be directly inside, the files can be in subfolders inside plugins), make files ending in -hat.spapi for each hat you want to make. The files should look like this:
# Name
{name of your hat}

# NorthSprites
{paths to your hat sprites, relative to the -hat.spapi file}

# SouthSprites
{paths to your hat sprites, relative to the -hat.spapi file}

# WestSprites
{paths to your hat sprites, relative to the -hat.spapi file}

# EastSprites
{paths to your hat sprites, relative to the -hat.spapi file}

# NorthwestSprites
{paths to your hat sprites, relative to the -hat.spapi file}

# NortheastSprites
{paths to your hat sprites, relative to the -hat.spapi file}

# HatRoomSprite
{sprite that will be displayed in the hat room} (optional, hat room sprite defaults to the first normal given hat sprite)

# XOffset
{your hat's horizontal offset, in pixels} (optional, defaults to 0)

# YOffset
{your hat's vertical offset, in pixels} (optional, defaults to 0)

# FPS
{fps for your hat's animations, if it's animated} (optional, defaults to 4. does nothing if the hat is not animated)

# AttachedToHead
{True if you want the hat to be achored on the character's head, False if you want it to be anchored on the character's eyes} (optional, defaults to True)

# InFrontWhenFacingBack
{True if you want the hat to be in front of the character while facing back, False otherwise} (optional, defaults to True)

# InFrontWhenFacingFront
{True if you want the hat to be in front of the character whlie facing front, False otherwise} (optional, defaults to True)

# FlipOnRoll
{True if you want the hat to flip when the player rolls, similarly to hats in Exit the Gungeon, False otherwise} (optional, defaults to True)

# VanishOnRoll
{True if you want the hat to disappear when the player rolls, False otherwise} (optional, defaults to False. takes priority over FlipOnRoll)

# FlipStartSound
{the sound you want to play when this hat's roll flip starts} (optional, defaults to no sound)

# FlipEndSound
{the sound you want to play when this hat's roll flip ends} (optional, defaults to no sound)

# FlipSpeed
{a speed multiplier for how fast this hat spins during its flip animation} (optional, defaults to 1. setting this to 0 will result in the hat simply bouncing above the player instead of spinning)

# FlipHeight
{a multiplier for how high this hat bounces during its flip animation} (optional, defaults to 1)

# FlipHorizontalWithPlayer
{True if this sprite should be automatically flipped with the player's sprite, False otherwise} (optional, if a value is not given it will be automatically decided based on the hat's directionality)
Properties can go in any order. Optional hat properties do not have to be included in the hat files, in which case they will instead get set to their default values. Not all Sprites properties have to be given in the file, the hat's directionality will be decided based on which sprite directions are given using this table:
Given sprite directions — Directionality — FlipHorizontalWithPlayer default
SouthSprites — None (single direction) — True
WestSprites, EastSprites — Two way (horizontal) — False
NorthSprites, SouthSprites — Two way (vertical) — True
NorthSprites, WestSprites, SouthSprites, EastSprites — Four way — False
All sprite directions given — Six way — False
Multiple sprite paths can be given for a sprite direction, in which case that direction will be animated. Sprite paths are relative to the hat file's folder, so a sprite path of hat_idle_001 for a hat file with the path plugins/YourHat/yourhat-hat.spapi will lead to plugins/YourHat/hat_idle_001.png, a sprite path of SomeSubfolder/hat_idle_001 will lead to plugins/YourHat/SomeSubfolder/hat_idle_001.png, etc. Sprite paths don't need to have extensions.
Hat Loader allows you to apply shaders to your hats. To do that, you need to add the ShaderName property to your hat file, followed by the name of the shader you want to use. For example:
# ShaderName
Brave/Internal/RainbowChestShader
You can also change the shader properties using the ShaderFloatProperties, ShaderIntProperties, ShaderColorProperties, ShaderVectorProperties and ShaderTextureProperties. They must be followed by pairs consisting of the shader property name as the first line and the property value for the second line. ShaderColorProperties parses the property value from a set of three numbers (for the R, G and B values) ranging from 0 to 1. You can also optionally give a fourth number for the alpha value. ShaderVectorProperties parses the property value from a set of up to 4 numbers (for the X, Y, Z and W values). Coordinate values that aren't given will default to 0. ShaderTextureProperties will use the given value to load a texture from the hat's folder. The loaded texture will be used as the value. Example:
# ShaderName
Brave/PlayerShaderEevee

# ShaderTextureProperties
_PortalTex
nebula_reducednoise
This will set the shader's _PortalTex property to the texture in the file nebula_reducednoise.png located in the hat's folder.
Hat Loader will automatically load soundbank files ending in -hatsb.bnk. You can use this to add custom sounds to your hats with the FlipStartSound and FlipEndSound properties. To easily make custom soundbanks you can use Captain Pretzel's gen-gungeon-audio-bank script, found here.
Hat Loader will automatically load asset bundles ending in *-hatbundle. Since custom shaders only work if the asset bundle they're in was built for the player's pla
Описание длинное — здесь его начало. Читать целиком на странице автора
В r2modman ставится автоматически
1 в каталоге
Добавляет более 500 новых шляп в Hat Room in the Breach! Вход в шляпную комнату находится с правой стороны от пролома возле комнаты лифта Shortcut, рядом с Винчестером.
Файл скачивается с официального сервера Thunderstore, без перезаливов и сторонних установщиков
Подробная инструкция для Enter the GungeonВставьте значок в описание на Thunderstore, в README или в Discord — русскоязычные игроки сразу попадут на страницу с переводом и инструкцией.

[](https://modka.app/enter-the-gungeon/specialapi-hat-loader/)<a href="https://modka.app/enter-the-gungeon/specialapi-hat-loader/"><img src="https://modka.app/badge.png" alt="Описание на русском — Модка" height="44"></a>[url=https://modka.app/enter-the-gungeon/specialapi-hat-loader/]Описание на русском — Модка[/url]Скачайте менеджер модов r2modman (или Gale) и выберите в нём игру Enter the Gungeon. Создайте профиль — так моды не смешаются с чистой версией игры. Найдите «Hat Loader» во вкладке Online и нажмите Download — BepInEx и все зависимости подтянутся сами. Нажмите «Start modded» — игра запустится с модами. Чтобы сыграть без модов, запустите игру как обычно из Steam — r2modman не трогает чистую версию игры.
Файл скачивается с официального сервера Thunderstore, куда его загрузил SpecialAPI. Мы не перезаливаем и не изменяем моды.
Установите вместе с ним: Mod the Gungeon API, Alexandria. В менеджере модов зависимости подтягиваются автоматически.
13 июля 2025, актуальная версия — 1.3.0. Это больше года назад: перед установкой проверьте, работает ли мод на текущей версии игры.

Мод, ориентированный на механику для входа в Gungeon O:

Большое DLC-подобное расширение для Enter The Gungeon, в котором представлены новые предметы, оружие, npcs и Gungeoneers.
Модульный персонаж, который не может использовать какое-либо оружие, кроме своего стартового оружия, но получает уникальные пассивные обновления. В комплекте с новыми спрайтами, новой механикой игрового процесса, разблокировками и прошлым, чтобы победить!

Не приноси нож в перестрелку! Мод для Gungeon
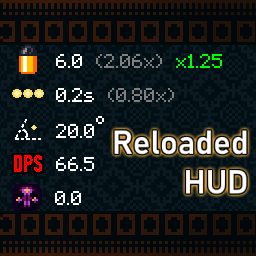
Добавляет стильный дисплей статистики, вдохновленный тем, что найден в The Binding of Isaac

Добавляет Лич в качестве играбельного персонажа.